Using ServiceNow system properties is a good way to allow configuration in your applications, but depending on the number of system properties your application has, it may become a challenge to remember all of those properties–especially for others who may be supporting your application later.
One way to help is to create a system properties page that shows all your properties in one location.
Setting up a system properties page is a pretty straightforward process and you’ll be so glad you went through the process. It’s like finally having all your garage tools organized in one tidy location! Walk with me as I show you how to set up your system properties page.
4 Things to Organizing System Properties with a System Properties Page:
- Create your system properties.
- Create a system properties category.
- Associate your system properties with your category.
- Create a module that links to your category page.
1. Create your system properties.
A great ServiceNow technique for creating configurations in your application is to store values in system properties rather than hard-coding configurations into your application’s code. For this example, I have a companion scoped application on my personal developer instance. In this application I created a few system properties to showcase how to organize them.
One thing to consider when creating system properties is a naming convention. When naming system properties, it’s useful to use a convention like this: company.application or process.description. For example, my company name is SpeckledFish and my application is sn-101. So if I had 2 system properties where one is storing a true/false configuration if the application should integrate with HRSD or another application, and the other is storing a comma-separated string of tables that I use when integrating with HRSD, I may name them:
speckledfish.sn101.hrsd.integration
speckledfish.sn101.hrsd.integration.tables
Having a standardized naming convention makes it easier to view your app’s properties in the list of other properties on your instances. Note that your application’s scope will be prepended to whatever value you put in the Suffix field so if this is a scoped application, the Name value will contain a reference to your scoped application. To create a system property:
- Get to the list of properties–enter this in your Filter navigator: sys_properties.list
- I recommend you search for the property first, before creating it.
- Click the New button in the list view.
- In the System Property form:
- Suffix field: enter the name using the standard naming convention: speckledfish.hrsd.integration
- The Name field should be auto populated with the scope prepended to the Suffix value.
- Enter a useful description: A configuration to let the scoped application do things differently if HRSD is installed on the instance.
- Choose the system property type: true | false
- Enter the Value: false
- Uncheck the Ignore Cache checkbox. Click here for information on this checkbox.
- Click Submit
- Complete these steps for as many system properties as you need.
2. Create a system properties category.
- Enter System Properties in the Filter navigator and click on Categories.
- Search to ensure the category doesn’t already exist.
- Click New
- Enter an effective name: SN-101
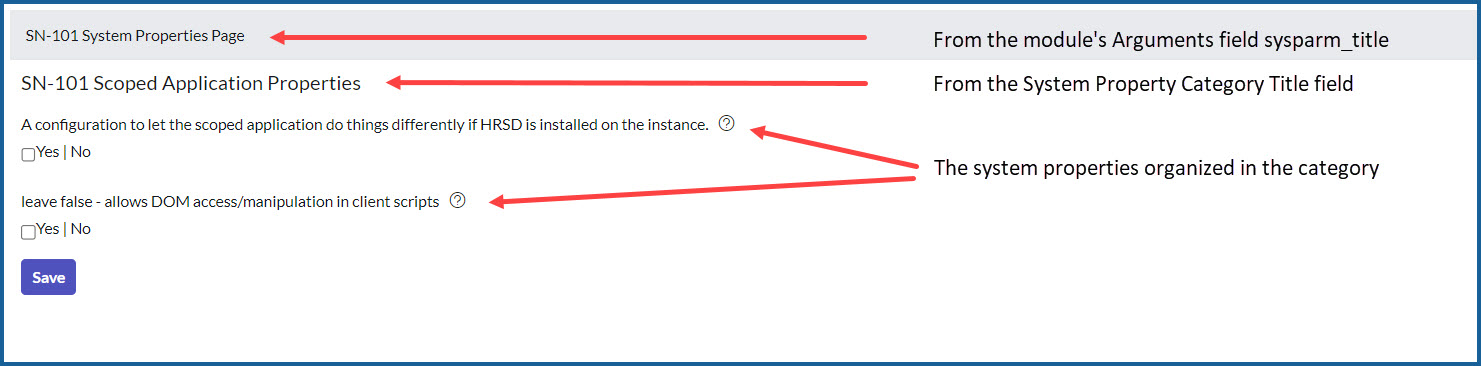
- Enter a Title: SN-101 Scope Application Properties
- Click Submit
3. Associate your system properties with your category.
- Open the list of system properties.
- Find the system properties you created.
- Open each property and select the category in the related list at the bottom of the form using the Edit button.
4. Create a module that links to your category page.
- Enter sys_app_module.list in the Filter navigator.
- Click New button
- Enter a useful Title: SN-101 System Properties
- NOTE: This is what appears on the module in the UI.
- Enter the Application menu: SN-101 for my application
- Enter a large number in the Order field (to ensure this module is at the bottom)
- In the Visibility tab select the role(s) that can see this module: admin
- In the Link Type tab select:
- Link type: URL (From Arguments:)
- Arguments: system_properties_ui.do?sysparm_title=SN-101 System Properties Page&sysparm_category=SN-101
- sysparm_title: this is what appears on the top of the properties page.
- sysparm_category: this is the system property category’s Name field
- Click Submit
That’s it! You will now have a well-organized set of system properties on a single page. On this page, you will be able set the values without having to go to the system property record. In your Filter navigator, enter the application menu name and you should see your properties page module at the bottom of the modules.