The problem: I want to have at the top of my advanced UI forms a banner that contains information from the record being displayed.
The solution: Use an onLoad Client Script to find the DOM elements containing the form banner and with jQuery add some CSS styling to create the banner and populate it with a value from the form.
*** WARNING ***
ENTER AT YOUR OWN RISK
This solution is using DOM manipulation. In nearly every bit of ServiceNow documentation doing this is frowned upon. So you need to do a bit of risk analysis on this. Here’s my risk analysis:
RISKS:
- This is standard front-end development using standard css.
- This is standard jQuery front-end development using normal jQuery methods
- The chances of ServiceNow changing the css classes used in showing forms and form fields in the advanced UI exists, but the likelihood is low (my assumption).
- If it breaks – simply back out of this solution by setting the onLoad Client Script to inactive.
BENEFITS: You get to add an eye-catching banner that gives users immediate information to help them.
How does this work? (there’s a step-by-step video at the bottom of this post)
- Forms are great for displaying information about a record, but there isn’t a way to create a banner at the top to get the user’s attention and display important information related to the record.
- You could use an Annotation, but then you’d have to figure out a way to populate it with the data you want displayed.
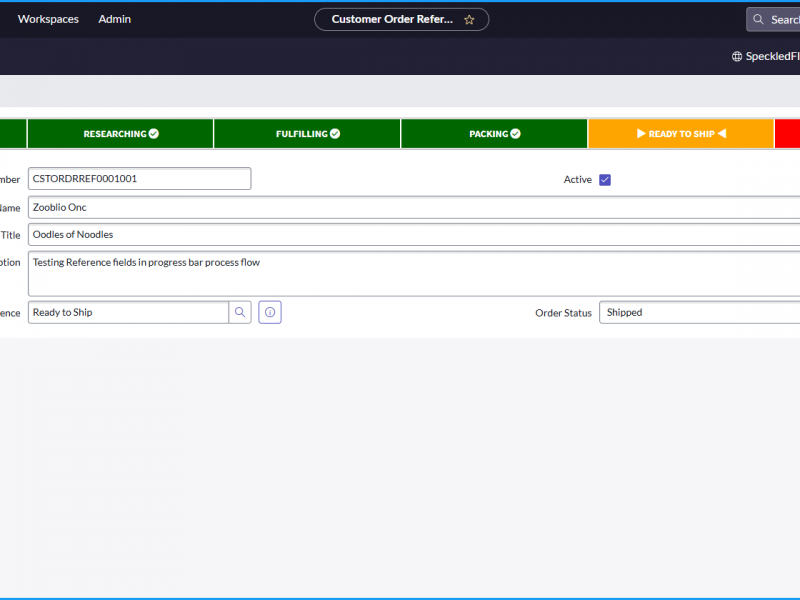
- Here is one example of when you might want to have such a banner:
- Your record is for a specific user in the system and you want information about that user in one place: Name, Phone, email, etc where it’s obvious to the user so they don’t have to search for it on the form.
- To make this work requires:
- Ensuring you can manipulate the DOM with client-side coding with an applicable system property.
- Creating a ‘Form Banner’ field on your table.
- Displaying that Form Value field by itself, at the top of your form in a 1-column layout at the top of the form.
- Creating an onLoad client script that looks for the DOM elements you’re manipulating.
- Capturing the value you want to display in your banner.
- Using jQuery to add CSS to the applicable DOM elements.
- Using jQuery to put the value into the display banner.
IMPORTANT BITS:
- The Form Banner field must sit in its own form section at the top of the form.
- In the video, when referring to the <div> element that is manipulated, I refer to the wrong <div> element. Here’s the correct one:

STEPS:
- If one doesn’t already exist, create a system property to ensure you can manipulate the DOM for your application.
- Filter navigator: sys_properties.list
- Search where Name contains ‘glide.script.block.client.globals’
- If you don’t have one for your scope, create one
- Suffix: glide.script.block.client.globals
- Type: True/False
- Value: false
- Add a “Form Banner” field to the table where you need a form banner.
- Configure your form layout to have this field at the top of the first form section in a 1-column form section.
- Determine what value you want in the Form Banner field.
- Create the code to get the value you want in the form banner field.
- Create an onLoad client script to add styling to create a form banner and populate the form banner.
CODE:
Display Business Rule:
(function executeRule(current, previous /*null when async*/) {

	var assignedToDisplayValue = current.getDisplayValue('assigned_to');
	g_scratchpad.assignedToDisplayValue = assignedToDisplayValue;

})(current, previous);
onLoad Client Script:
function onLoad() {
	var assignedToDisplayValue = g_scratchpad.assignedToDisplayValue;
	var formBannerValue = g_form.getValue('short_description') + " for " + assignedToDisplayValue;
	createAndPopulateBanner(formBannerValue);
/*
What's going on here?
1. Line 3 is getting the value we want to display in the form banner
2. The call to createBanner passes in the value to populate the form banner and runs the jQuery code, which is doing this:
	a. Finding the div element that had and id attribute that contains the name of the form banner field 'form_banner'
	b. Adding CSS styling to that div element
	c. Populating the text (in between the <div>...</div> with the value to be populate)
*/


}
function createAndPopulateBanner(formBannerValue){
	// note the id*='' below should have the field name if you choose to create a different field than form_banner
	// you can add css styling in the .css method
	// look here for how to add multiple css values at one:
	// https://www.w3schools.com/jquery/jquery_css.asp#:~:text=To%20set%20multiple%20CSS%20properties
	jQuery("div[id*='.form_banner']")
		.css({
		'border-radius':'6px',
		'font-size':'30px',
		'font-weight':'bold',
		'background-color':'#095a91',
		'color':'#fff',
		'height':'50px',
		'padding': '5px 10px 10px 10px'
	}).text(formBannerValue);
}VIDEO: Here’s a video walking through the entire process: