
I was having trouble getting emails to send from my personal developer instance (PDI). After a little bit of research I found the answer. I found 2 things that I needed to fix on my PDI that I fixed, but this article walks you through the areas you should check to ensure outbound and inbound emails will work. Here are what you should check and fix:
- That email sending is enabled.
- That email receiving is enabled.
- That the Server value for the ServiceNow SMTP email account is set to relay
- My From email address for the ServiceNow SMTP email account is correct (username@service-now.com)
My problem was that #3 and #4 above were wrong. Once I fixed these 2 things, I was able to send emails from my PDI.
Here’s how you check and fix the above 4 items.
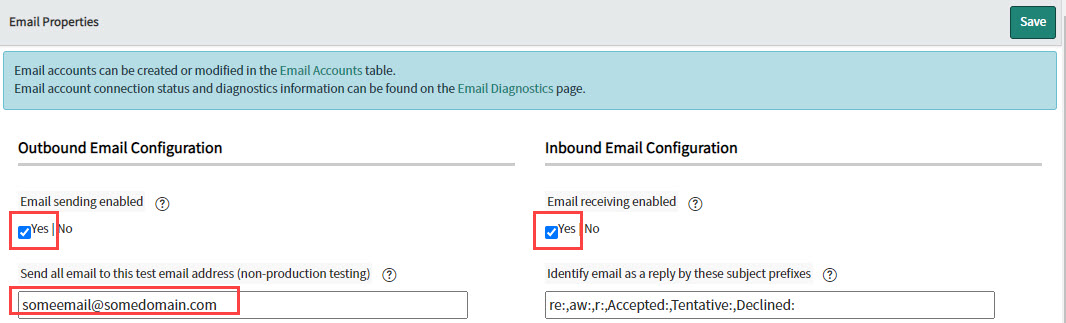
- Enabling email sending:
- Ensure you are in the Global scope
- Enter System Properties in the filter navigator
- Click on Email Properties
- Look in the left column beneath “Outbound Email Configuration“
- Ensure [x] Yes is checked
- Enter an email where you want all emails to be sent in the “Send all email to this test email…” field
- Click the “Save” button at the top of the form
- Enabling email receiving:
- Ensure you are in the Global scope
- Enter System Properties in the filter navigator.
- Click on Email Properties
- Look in the right column beneath “Inbound Email Configuration“
- Ensure [x] Yes is selected
- Click the “Save” button at the top of the form.
- Updating the ServiceNow SMTP email account’s “Server” field:
- Go to the email addresses form by entering Email Accounts in your filter navigator
- Click on “Email Accounts” beneath the Administration menu.
- Click on “ServiceNow SMTP” account to open it.
- Updating the Server Field:
- Check the value of the “Server” field – if it’s not ‘relay‘ that will need to be changed. This one will require a script in scripts – background to change this value because it’s a read-only value protected by access controls (ACLs).
- Run the below script in Scripts – Background:
- Enter scripts – background in the Filter navigator:
- Click on “Scripts – Background“
- Enter the below script in the Run script (JavasScript executed on server) field then click the “Run script” button below the script field:
var emailAccountSysID = getSMTPEmailAcountSysID();
var emailAccount = new GlideRecord('sys_email_account');
if (emailAccount.get(emailAccountSysID)) {
	var name = emailAccount.getValue('name');
	var server = emailAccount.getValue('server');
	gs.info("email account: " + name + " Server: " + server + " SysID: " + emailAccountSysID);
	var newServer = 'relay';
	emailAccount.setValue('server', newServer);
	emailAccount.update();

}

function getSMTPEmailAcountSysID() {
var smtpEmailAccountSysID = false;
	var smtpEmailAccount = new GlideRecord('sys_email_account');
	var encodedQuery = "name=ServiceNow SMTP";
	smtpEmailAccount.addEncodedQuery(encodedQuery);
	smtpEmailAccount.query();
	if (smtpEmailAccount.next() ) {
		smtpEmailAccountSysID = smtpEmailAccount.getValue('sys_id');
	}
	return smtpEmailAccountSysID;

}- Updating the ServiceNow SMTP email account’s From field:
- Check the value of the “From” field – it should be the value in the User name field with @service-now.com – like this:
- dev######@service-now.com
- if it’s not the same as the “User name” field, that will need to be changed to match the User name field. This one is straightforward. Just copy the User name field and paste it into the From field. Then add @service-now.com after the username. Then Save or Update the record.
- Check the value of the “From” field – it should be the value in the User name field with @service-now.com – like this:
- Testing the Email sending functionality. ServiceNow has an API that allows you to send email from scripts. Copy and paste the below script into your scripts – background and run this script in GLOBAL scope. This should create an email record and send it to the test email address you added when you enabled email sending earlier.
- After copying, pasting and running the below script in scripts – background, verify it was sent by entering “Emails” in the Filter navigator and opening the list of emails. Check to ensure the email that was created shows “Sent” in the Type column. Now check the email account that you entered into the Outbound Email Configuration earlier. The email should be there now.
var mail = new global.GlideEmailOutbound();
mail.setSubject('Testing GlideEmailOutbound');
var toEmail = "someemail@somedomain.com";
mail.addRecipient(toEmail);
var ccEmail = "someCCEmail@somedomain.com";
mail.addAddress('cc', ccEmail);
mail.setBody("<span style='font-size:22px;color:red;'>This is a test to ensure my PDI is sending emails.</span>");
mail.save();