
Whenever we want to add information to a form’s field or series of fields, we can use ServiceNow’s g_form.showFieldMsg() method to add field messages to one or more fields. The challenge with this is that the ServiceNow platform puts those field messages below the field. It seems that having those field messages above the field would be a more intuitive user experience.
This article helps us do that – display field messages above the respective field. There’s also a nifty video walking through the process – way down there at the bottom.
*** WARNING ***
This solution is using DOM manipulation. In nearly every bit of ServiceNow documentation doing this is frowned upon. So you need to do a bit of risk analysis on this. Here’s my risk analysis:
RISKS:
- ServiceNow could adjust how the advance UI form DOM is created. While this is a possibility, the likelihood of this happening is low.
- The injected JavaScript code breaks.
RISK CONSIDERATIONS:
- This is all core ServiceNow functionality using a UI Macro and a UI Formatter to add JavaScript to a table’s form.
- This is standard front-end development using vanilla JavaScript.
- If it breaks – minimal impact – the field messages simply won’t get repositioned.
This doesn’t change the DOM, it merely finds all the field messages and repositions them to be above the field.
BENEFITS: You get a more intuitive and enhanced user experience with low risk (yes even with DOM manipulation).
Hey Rick, How does this work?
- UI Macros are used throughout the platform and are injected into a table’s form through a UI Formatter. This article walks through a solution that exploits this functionality.
- The JavaScript in the UI Macro is robust enough to find all fields with field messages. The code finds the element’s id of each field message. These id values all end in “_fieldmsg” with the beginning of these element ids matching the element id for the respective field.
- The code simply gets the respective field id and uses vanilla JavaScript to tell the field message’s HTML element to be positioned before the field rather than after the field.
NOTE: this code will find and relocate all field messages. You can adjust the code to skip field messages by adding an array of the field messages to skip, check for those ids, and skip the process of relocating them.
IMPORTANT BITS:
- You use an onLoad Client Script to add field messaging to your form.
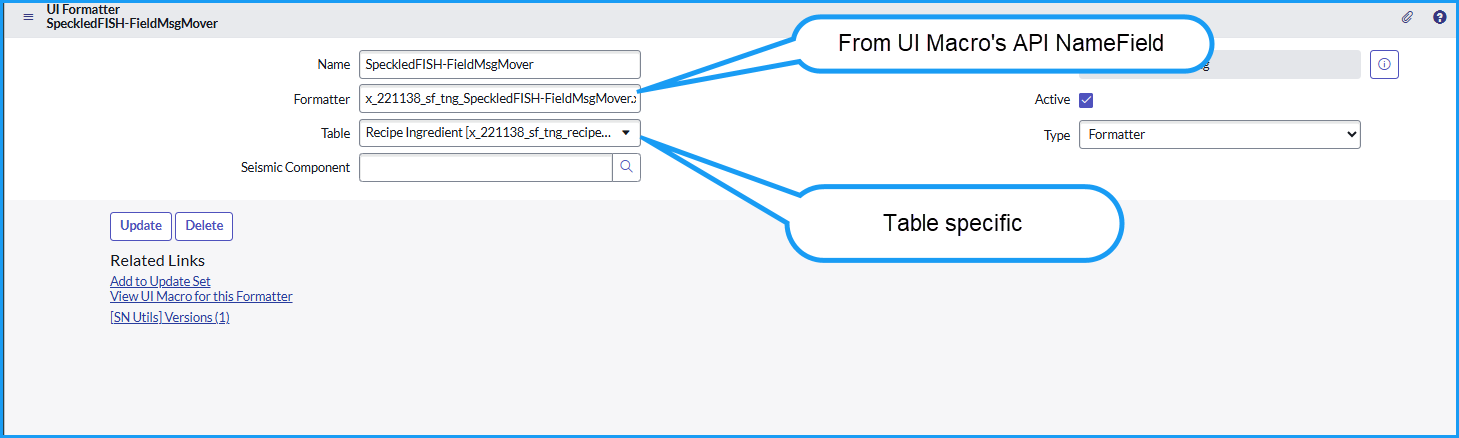
- You need a UI Macro that contains the necessary JavaScript.
- You need a UI Formatter to get the UI Macro into the form.
- UI Formatters are table specific – so you’ll need a UI Formatter for every table where you want to relocate field messages—but they all use the same UI Macro.
- Adjust your form’s layout and include the UI Formatter anywhere on the form – my preference is to always include this UI Formatter at the bottom of the form.
STEPS:
- Create the onLoad Client Script for each table form where you need to use field messages.
- Create a UI Macro.
- Create a UI Formatter for each table where you want to relocate field messages on that table’s form.
- Use the same UI Macro for all UI Formatters.
- Add the UI Formatter to the form’s layout for each table.
AND HERE ARE SCREENSHOTS and THE CODE:
OnLoad Client Script
(click image to view in a new tab)

function onLoad() {
   /*
	Dude - let's make life easier for the user, ok?
	Add some messaging about each field.
   */
  var fieldMessageObj = {
	'ready_to_reorder':'Select "Yes" if you are low on inventory for this ingredient',
	'ingredient_name':'Add a clear name for this ingredient',
	'allergy_information':'Add information that helps the user understand allergies'
  };
  for (var fieldName in fieldMessageObj){
	var fieldMessage = fieldMessageObj[fieldName];
	g_form.showFieldMsg(fieldName, fieldMessage);
  }

}
UI Macro
(click image to view in a new tab)
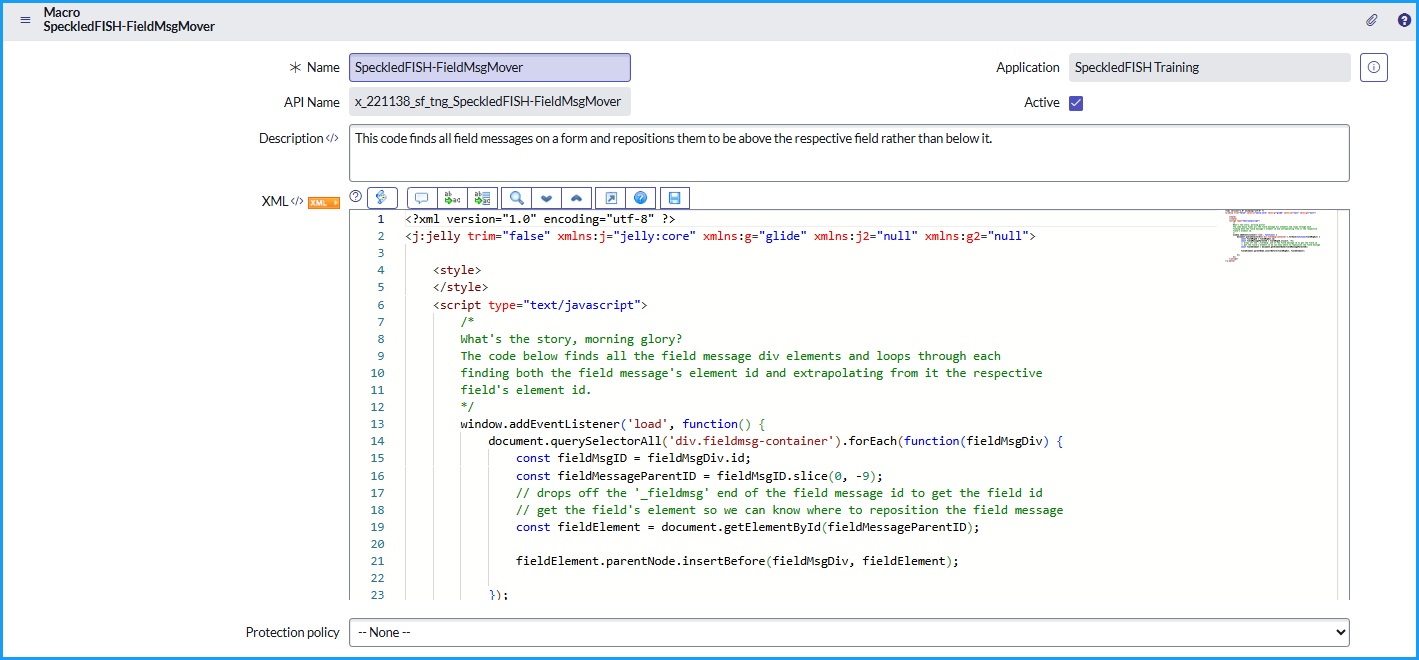
<?xml version="1.0" encoding="utf-8" ?>
<j:jelly trim="false" xmlns:j="jelly:core" xmlns:g="glide" xmlns:j2="null" xmlns:g2="null">

    <style>
    </style>
    <script type="text/javascript">
		/*
		What's the story, morning glory?
		The code below finds all the field message div elements and loops through each
		finding both the field message's element id and extrapolating from it the respective
		field's element id.
		*/
        window.addEventListener('load', function() {
            document.querySelectorAll('div.fieldmsg-container').forEach(function(fieldMsgDiv) {
                const fieldMsgID = fieldMsgDiv.id;
                const fieldMessageParentID = fieldMsgID.slice(0, -9);
				// drops off the '_fieldmsg' end of the field message id to get the field id
                // get the field's element so we can know where to reposition the field message
				const fieldElement = document.getElementById(fieldMessageParentID);

                fieldElement.parentNode.insertBefore(fieldMsgDiv, fieldElement);

            });
        });
    </script>
</j:jelly>
UI Formatter
(click image to view in a new tab)
AND AS PROMISED, THE NIFTY VIDEO:
Pay close attention about 3/4 of the way through the video and you’ll hear Bongo, my Bloodhound/German Shepherd mix dog whimpering because he wanted to watch us move these form messages too.